How-To: Implement Pub/sub
Context
I have a distributed application and need to decouple my application by implementing Pub/Sub into my architecture. How can I do that with Copilot?
Solution
In distributed applications, quite often we need to let other services react to events created by other services. These events could be anything — from order created by customers to a payment received by 3rd party services.
Asynchronous communication is considered as the most effective way to enable this interaction. In contrast with synchronous communication (i.e. HTTP API), with asynchronous communication, we can avoid blocking the sender to wait for a response as well as decoupling producer from consumer.
Pub/Sub or also known as Publish/Subscribe is a form of asynchronous communication for service-to-service. The Publish Subscribe model allows messages to be broadcasted to different parts of a system asynchronously. This gives us advantage as we can scale those services independently while still having integration with other services.
AWS provides flexibilities to implement pub/sub for developers. One way to achieve that with AWS is by using integration between Amazon SNS and Amazon SQS.
The good news is AWS Copilot supports publish/subscribe architectures. AWS Copilot services and jobs can use the publish field to broadcast events to Amazon SNS topics. Amazon SNS topics then can be subscribed by Amazon SQS queues. The message can be received by defining Worker service in Copilot app.
Diagram Architecture
This is the diagram architecture that we’ll build in this workshop.
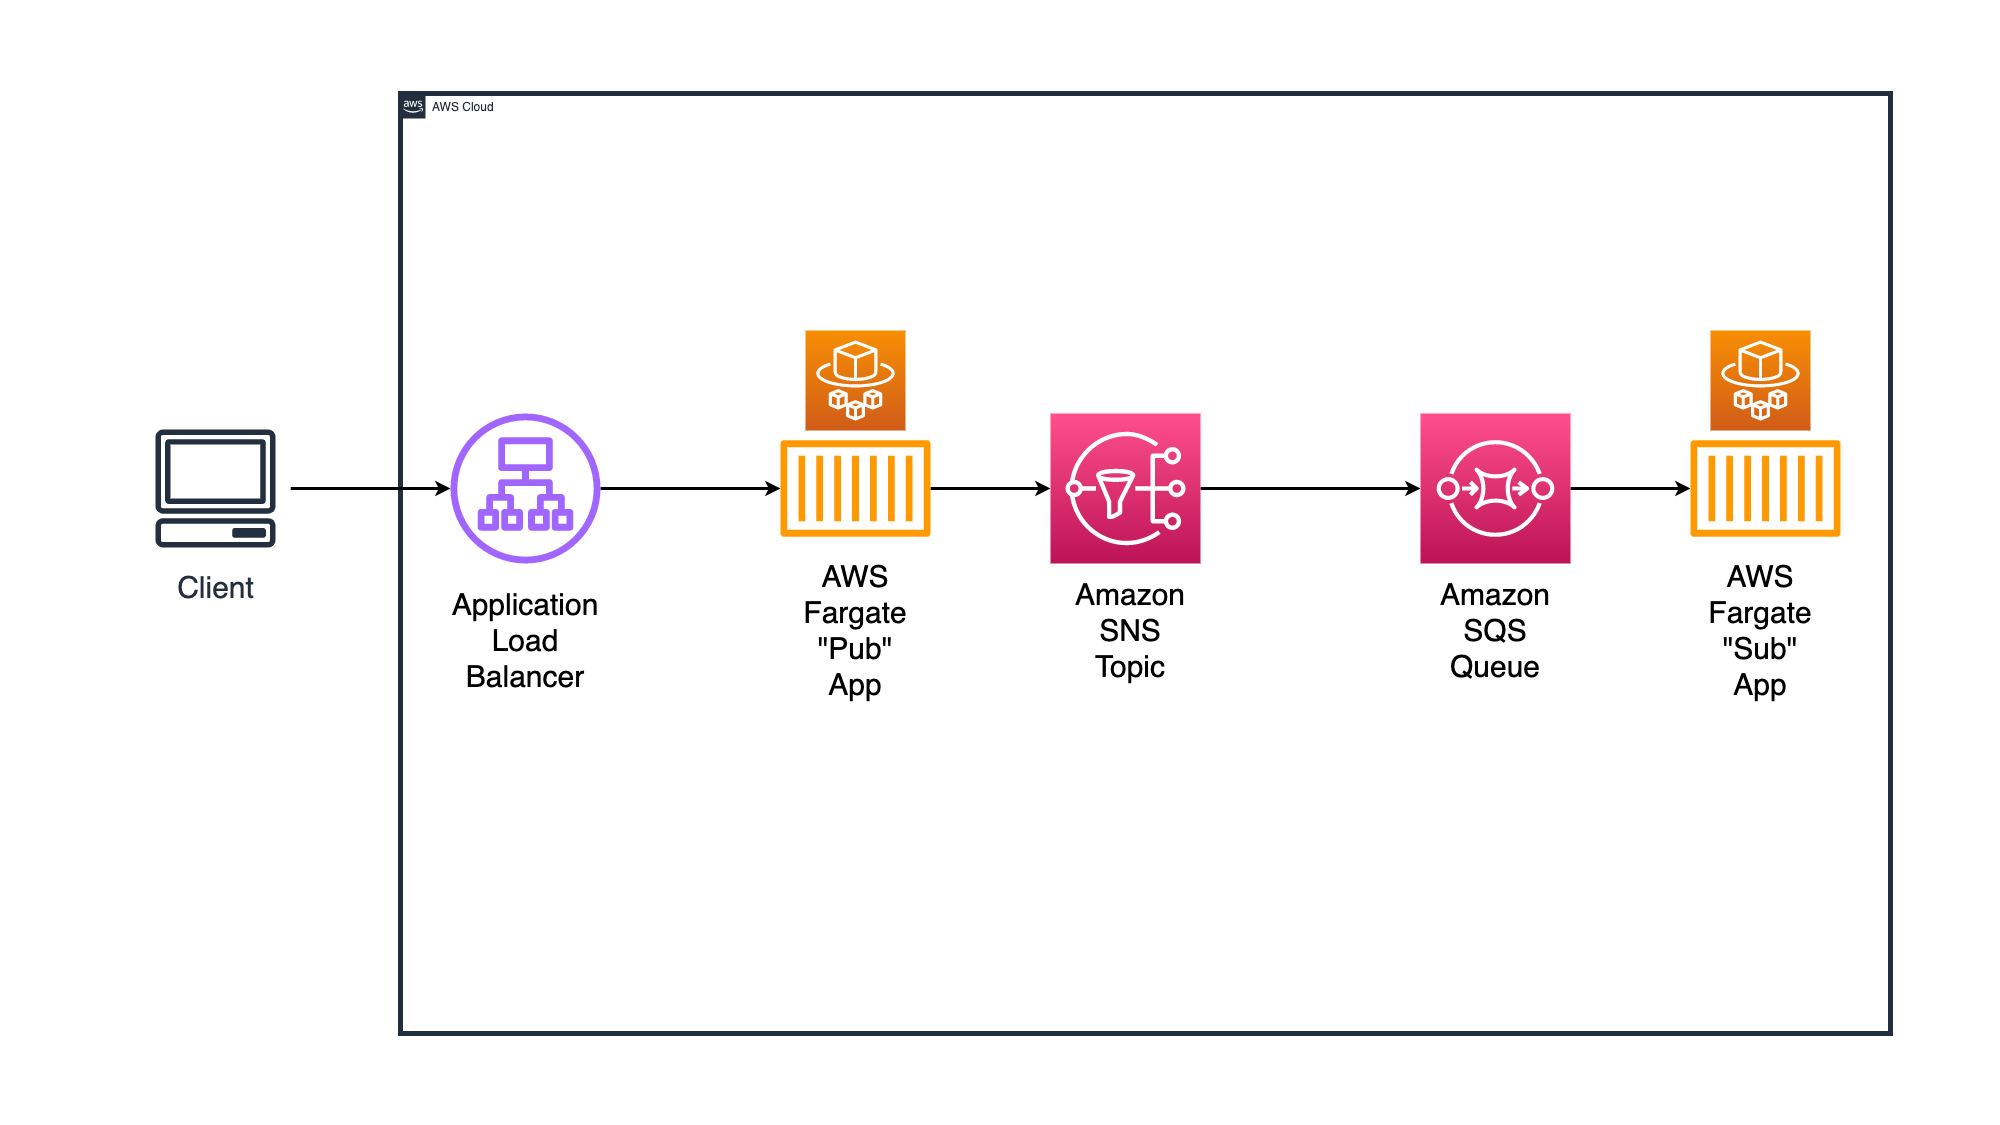
In this workshop, you’ll learn how to implement Pub/Sub pattern, by creating a "Pub" service — which will publish an event to Amazon SNS topic.
On the other end, we have an Amazon SQS Queue which will be subscribed to that particular Amazon SNS topic. This way, all events published by "Pub" service to Amazon SNS topic, will also be delivered to Amazon SQS queue.
The "Sub" service will listen to the Amazon SQS queue and process the message.
Tutorial Preparation
To run this tutorial, please use following information for preparation:
| Activity name | What to input? | Related Tutorial |
|---|---|---|
| Get source code from folder | codes/pub-sub |
/getting-started/10-how-to-use-codes-and-init/ |
| Initialize application | copilot-pubsub |
/getting-started/10-how-to-use-codes-and-init/ |
| Create environment | test |
Step-by-step Guide
Step 1: Initialize application
Our first step would be configuring the Copilot application.
Task 1: Run copilot init
When we initialize Copilot application, we need to define the first service that we need to create. In this case, we are going to deploy Pub service. To initialize the Copilot app, run the following command
copilot init --app copilot-pubsub --name pub --type "Load Balanced Web Service" --dockerfile pub/Dockerfile
At the end of this activity, you will see similar output as below:
Ok great, we'll set up a Load Balanced Web Service named pub in application copilot-pubsub listening on port 9090.

✔ Created the infrastructure to manage services and jobs under application copilot-pubsub..

✔ The directory copilot will hold service manifests for application copilot-pubsub.

✔ Wrote the manifest for service pub at copilot/pub/manifest.yml
Your manifest contains configurations like your container size and port (:9090).

✔ Created ECR repositories for service pub..

All right, you're all set for local development.

Would you like to deploy a test environment? [? for help] (y/N)
Copilot will ask if you want to deploy the application into a test environment, choose No (N). The reason is we haven't configured the healthcheck in Pub manifest.
At the end of this stage, you will have a manifest file for pub service located at copilot/pub/manifest.yml.
Task 2: Create environment
The next thing that we need to do is create the environment called test. In this workshop, we are using the default configuration to create the environment.
copilot env init --name test --profile default --app copilot-pubsub --default-config
Step 1: Deploy “Pub”
The pub service will process HTTP requests from clients and publish the message payload to Amazon SNS topic. The message payload is a random string so it would make it easier to identify during the testing step.
At this stage, we have initialized the Copilot application called copilot-pubsub, the pub service, and the test environment. We now need to deploy the pub service.
Code Overview
All source code for pub service is located in pub-sub/pub folder. Here's the tree view of the folder:
.
│   ├── Dockerfile
│   ├── app.py
│   └── requirements.txt
Task 1: Configure healthcheck
As we have initialized the pub service in the previous step, what we need to do now is to configure the service. In this step, we need to configure the health check endpoint.
To do this, we will need to modify some properties on the manifest file located at copilot/pub/manifest.yml.
- Open
copilot/pub/manifest.ymlfile. - In the
httpsection, uncomment and modify thehealthcheckproperty to:
healthcheck: /ping
This will define the ALB health check endpoint to /ping that we already defined in our pub application.
The full configuration for http section will look like this:
http:
  path: '/'
  healthcheck: '/ping'
- Save the manifest file
Task 2: Define Amazon SNS Topic
To implement Pub/Sub pattern in our application, we need to do these activities with the following order:
- Define the Amazon SNS Topic
- Configure the service to use the SNS topic from environment variables
- Define the Amazon SQS queue and subscribe to the Amazon SNS topic
- Configure the service to use the SQS queue from environment variables
In this task, we will do the activity [1] and [2].
To define the Amazon SNS topic, follow the instructions below:
- Open
copilot/pub/manifest.yml - Add following lines to the end of the file:
publish:
  topics:
    - name: ping
The above lines define the SNS topic called ping.
Task 3: Configure "pub" service load Amazon SNS Topic
When Copilot deploys the Amazon SNS Topic, it will automatically inject variable called COPILOT_SNS_TOPIC_ARNS. This variable is a tuple list of Amazon SNS topics with following JSON structure:
{
    "TOPIC_NAME_1":"TOPIC_ARN_1",
    "TOPIC_NAME_2":"TOPIC_ARN_2",
    "TOPIC_NAME_3":"TOPIC_ARN_3"
    ...
}
To interact with Amazon SNS topic with AWS SDK — this workshop is using boto3 — we need to pass the SNS topic ARN. This means that we need to load the environment variable and its value properly.
To have a better understanding on how to interact with Amazon SNS, let's review the pub/app.py.
In the beginning of the application, we see the following line.
TOPIC_ARNS = json.loads(os.getenv("COPILOT_SNS_TOPIC_ARNS"))
This line demonstrates how to get the environment variable called COPILOT_SNS_TOPIC_ARNS by using os.getenv() function. As the value of the variable is structured in JSON, we are loading the string by using json.loads() function.
Then, in the hello_world() function — when all requests are being processed — we will see following lines:
response = client.publish(
        TopicArn=TOPIC_ARNS["ping"],
        Message=ping_message
The above lines shows how to use the TOPIC_ARNS variable and noticed that we are getting the ARN value with topic name ping as the key.
Task 4: Deploy "pub" service
We have configured the pub service, and what we need to do in this step is to deploy the pub service into the test environment.
To do this, run the following command:
copilot svc deploy --name pub --env test
Step 2: Deploy “Sub”
Once we have the sub service running, it will do polling to Amazon SQS queue, and process the request. The sub service will print out the message it received from the pub service and delete the message from the queue.
In this step, we will initialize, and configure the Amazon SQS queue integration with the pub service as well as deploy the service.
Code Overview
All source code for sub service is located in pub-sub/sub folder. Here's the tree view of the folder:
.
│   ├── Dockerfile
│   ├── app.py
│   └── requirements.txt
Task 1: Initialize "sub" service
In this step, we are going to initialize the sub service as "Worker Service". In addition, we will also subscribe the service to Amazon SNS topic called pingwhich we have defined in previous step.
To initialize the sub service, run the following command:
copilot svc init --name sub --svc-type "Worker Service" --dockerfile ./sub/Dockerfile --subscribe-topics pub:ping
One particular flag that you need to understand is the --subscribe-topics. This flag will subscribe the Amaozn SQS queue created along with the sub service to the Amazon SNS topic called ping. The format to define the flag is <SERVICE_NAME>:<TOPIC_NAME>
The above command will initialize the service in one simple command. However, you can also run copilot svc init and go through the guided experience with Copilot.
Once Copilot is done initializing the service, it will create the manifest file located in copilot/sub/manifest.yml.
Task 2: Configure "sub" service to load Amazon SQS queue
When Copilot deploys the Amazon SQS queue, it will automatically inject variable called COPILOT_QUEUE_URI. With this variable we can directly retrieve the Amazon SQS queue URI and interact with the queue.
To have a better understanding on how to interact with the SQS queue, let's open the sub/app.py.
In the beginning of the file, you will the following line:
COPILOT_QUEUE_URI = os.getenv("COPILOT_QUEUE_URI")
This line shows how to load the COPILOT_QUEUE_URI from the environment variable by using os.getenv() function. The variable is being used in 2 functions: receive_queue_message() and delete_queue_message().
To get the messages in the queue, we need to use the receive_message() function provided by the sqs_client library. Below line shows how to receive the message:
response = sqs_client.receive_message(QueueUrl=COPILOT_QUEUE_URI, WaitTimeSeconds=5, MaxNumberOfMessages=1)
Once the message is successfully processed, we need to remove the message from the queue, to avoid duplicated processing. To remove the message we can use delete_message function.
response = sqs_client.delete_message(QueueUrl=COPILOT_QUEUE_URI,
                                             ReceiptHandle=receipt_handle)
Task 3: Deploy "sub" service
We have configured the sub service, and what we need to do in this step is to deploy the sub service into the test environment.
To do this, run the following command:
copilot svc deploy --name sub --env test
Step 3: Test Application
Let's review how the application works first before doing the test for our application.
- Send the request to "pub" service with endpoint "/". The "pub" service will also publish a message with randomized string to Amazon SNS Topic
- In the background, Amazon SNS topic will receive the message from "pub" and deliver the message to Amazon SQS queue.
- The message is now in the Amazon SQS queue and "sub" service will listen and process the message. The "sub" service will also print out the logs so we can check the result.
Task 1: Send request to "pub" service
To send a request to the "pub" endpoint, we need to know the URL of the "pub" service. To do this, run the following command:
copilot svc show --name pub
In the output, you will see the following details:
Routes

  Environment       URL
  -----------       ---
  test              http://SVC_URL
This is the public URL of the service — that's deployed in test environment — that we can send the request. Copy the value.
To send a request we can use curl command to the / endpoint. To send a request, do the following command:
curl http://SVC_URL/
This will send a request with GET method to / endpoint which will be processed by the pub service and publish the message to Amazon SNS topic.
The "pub" service will return a similar output:
{
    "message": "Hello! Message sent: tuzjc"
}
The last word is a generated random string to help us test if the sub service received the message.
Task 2: Evaluate the logs in "sub" service
In the background, the sub service is listening to any messages in the queue, process the request — receive and delete the message — as well as printing out the message to the logs.
To check the message in the sub service logs, we can use copilot svc logs command. To do this, run the following command:
copilot svc logs --name sub --env test --follow
The --follow flag will help us to see the latest logs from the service.
In the logs, you will find the message published by the pub service. Your logs should look like below:
Received and deleted message(s) from SQS_QUEUE with message {
  'ResponseMetadata': {
    'RequestId': '4ac86e8e-ba44-5a2f-9e54-348394c8bea4',
    'HTTPStatusCode': 200,
    'HTTPHeaders': {
      'x-amzn-requestid': '4ac86e8e-ba44-5a2f-9e54-348394c8bea4',
      'date': 'DATE',
      'content-type': 'text/xml',
      'content-length': '215'
    },
    'RetryAttempts': 0
  }
}.
...

{
  'Messages': [
    {
      'MessageId': 'MESSAGE_ID',
      'ReceiptHandle': 'RECEIPT_HANDLER',
      'MD5OfBody': 'a32de76d9172083ae346ad27e01563ed',
      'Body': '{\n  "Type" : "Notification",\n  "MessageId" : "ce6bcfc2-b5c8-529e-926e-95cf9b4459a8",\n  "TopicArn" : "arn:aws:sns:ap-southeast-1:194989662172:copilot-pubsub-test-pub-ping",\n  "Message" : "Hello! Message sent: tuzjc",\n  "Timestamp" : "TIMESTAMP",\n  "SignatureVersion" : "1",\n  "Signature" : "SIGNATURE",\n  "SigningCertURL" : "SIGNING_CERT_URL",\n  "UnsubscribeURL" : "UNSUBSCRIBE_URL"\n}'
    }
  ],
  'ResponseMetadata': {
    'RequestId': 'b6c06fa8-acfa-52d3-a39d-35a582735658',
    'HTTPStatusCode': 200,
    'HTTPHeaders': {
      'x-amzn-requestid': 'b6c06fa8-acfa-52d3-a39d-35a582735658',
      'date': 'DATE',
      'content-type': 'text/xml',
      'content-length': '2062'
    },
    'RetryAttempts': 0
  }
}
In the Messages[], you see that we have received a message from pub service with the same random string generated by the pub service.
Step 4: Cleaning up
If you no longer work on this tutorial, you can remove all resources by running following command:
copilot app delete